
Create the owner account#
SpaceApp has one owner account, and there is no default password. The first page, Create your Space owner, asks for:
- Owner email: the address you will sign in with.
- One-time setup token: the value printed by the installer on the line
One-time setup token:. The field hides what you paste. - New password and Confirm password: at least 12 characters.
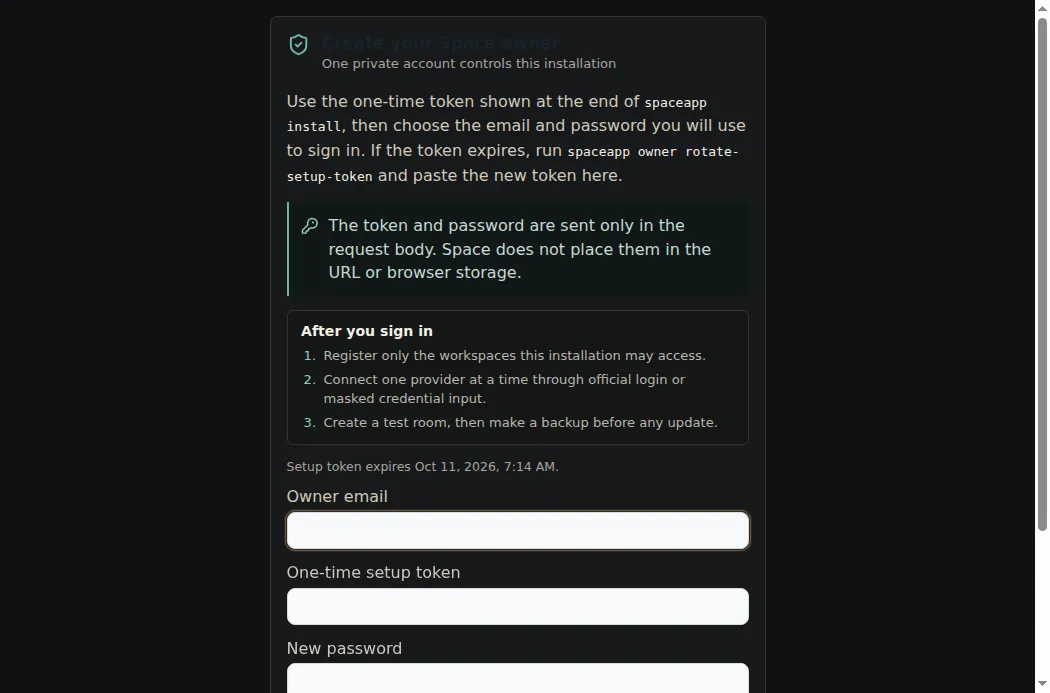
The setup token proves that the person creating the owner can read the installer's terminal on the host. The installer creates a fresh random token at the end of every successful install while no owner exists. It is valid for 15 minutes, works once, and stops working as soon as the owner is created. Enter it only on this page; never put it in a prompt, a chat, a screenshot, an issue or canonical memory.
Select Create owner account. SpaceApp signs you in and opens the setup wizard.
If the token has expired, or you closed the terminal before copying it, create a new one on the host:
npx --yes run-spaceapp@latest owner rotate-setup-tokenIt prints New one-time setup token: … and It expires in 15 minutes and only works before the first owner is claimed. Paste the new value into the page; reload it to see the new expiry time. Rotation is refused once an owner exists; running install again while no owner exists also prints a fresh token.
A lost owner password uses a different operation. The new password is read with masked input:
npx --yes run-spaceapp@latest owner reset-passwordThe Getting Started room and OpenCode#
After sign-in, the Setup & connections wizard opens with four steps: Welcome, Tools, Connections and Ready. It explains rooms (separate workspaces for projects), panes (a CLI, Chat or Browser inside a room) and docks, and recommends OpenCode as the first tool. You can select Finish for now at any point and reopen the wizard later from Help → Setup wizard.
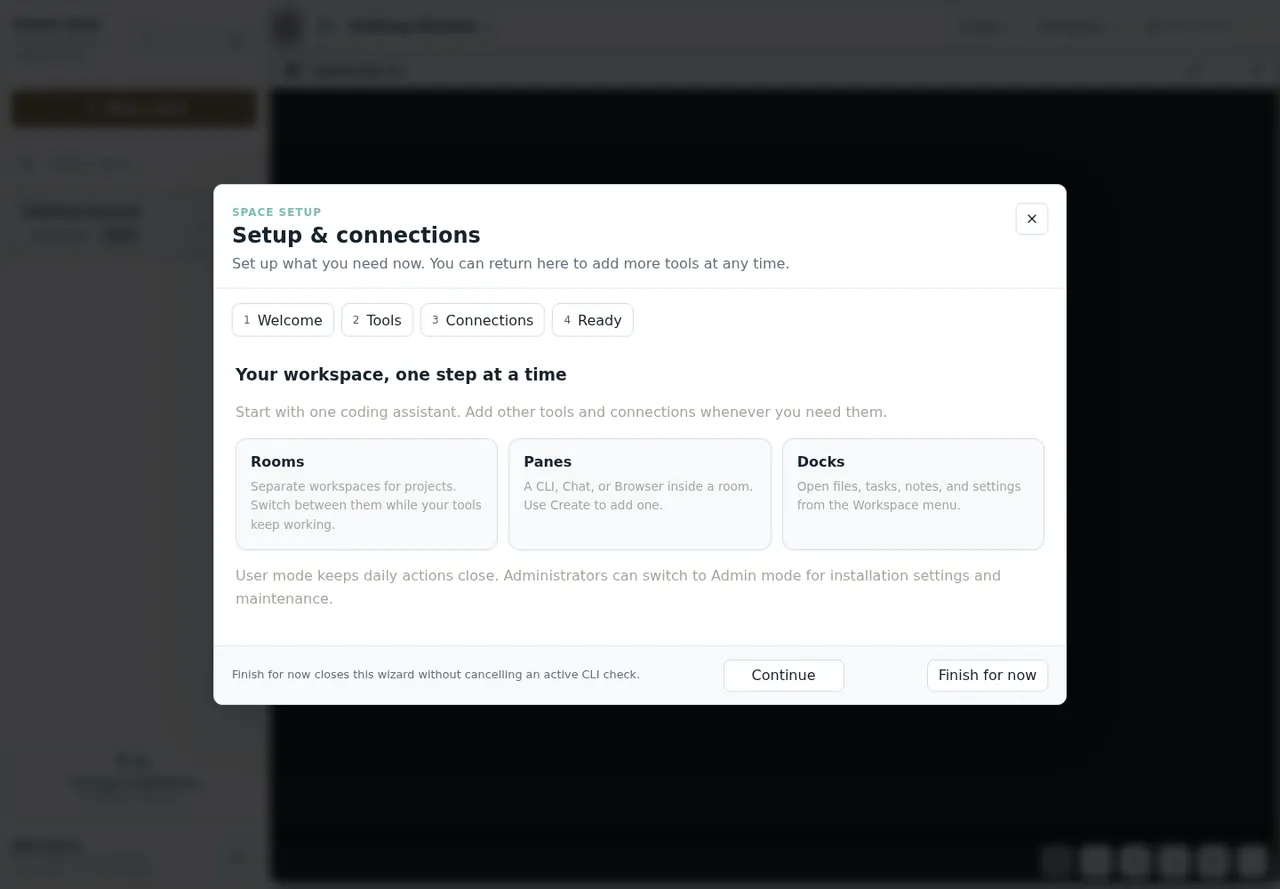
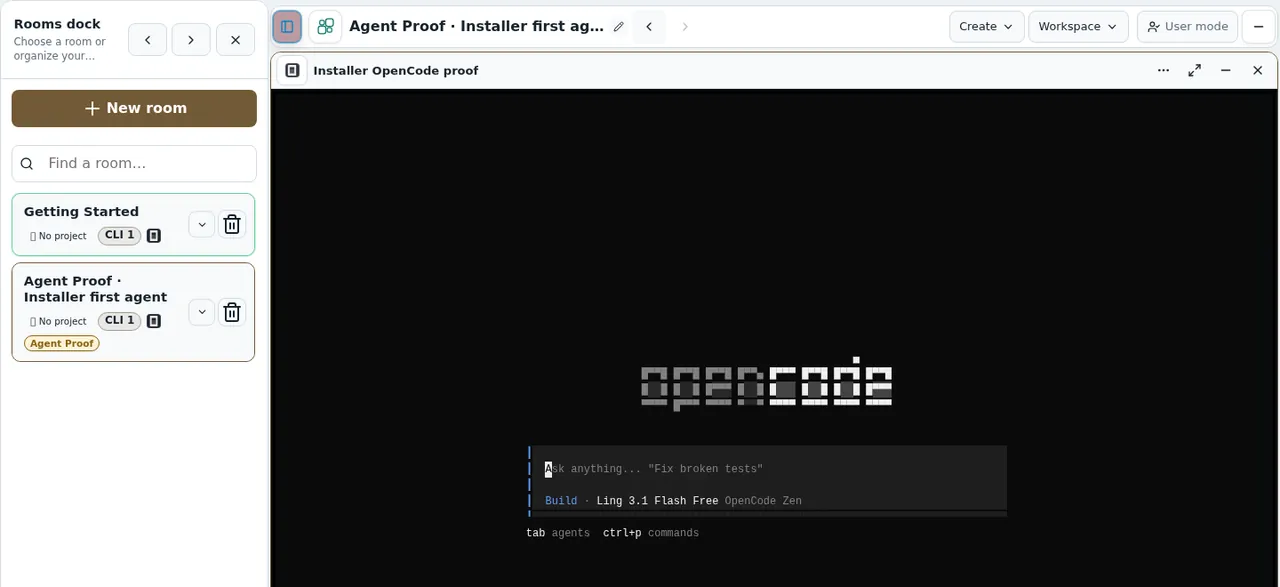
SpaceApp creates a room named Getting Started for you and selects it first; it is listed in the Rooms dock on the left. Start there. If the room has no OpenCode pane, use Create in the top bar to add a CLI pane and choose OpenCode.
From 1.1.4, a CLI pane in a room without a project of its own works in that room's own folder, /workspaces/<room id>, which is kept across updates and included in backups. Earlier releases started it in /etc, where the agent cannot create files, so a first request such as "create a page" failed. The last step of the Setup & connections wizard (Ready) also lists three first prompts with Copy buttons; paste one into the OpenCode pane and press Enter.
OpenCode is built into the SpaceApp CLI image (opencode-ai 1.18.4 in release 1.1.4). It needs no account and no API key for its free models, which are served by OpenCode Zen.
The free starter model. On its first launch, OpenCode chooses a working free model. From 1.1.2 on, it tries Big Pickle (opencode/big-pickle) first, and a model passes only if it completes a real tool call: it must read a small file with its read tool and answer with the random value inside it. If Big Pickle fails, the newest free models that support tool calls are tried in the same way. (1.1.1 accepted the first free model that answered a plain text request, which could pick a model that later failed on tool calls.)
The check can take up to about two minutes on first launch. The chosen model is shown under the prompt, for example Build · Big Pickle OpenCode Zen. In the 1.1.2 release tests, Linux, macOS and Windows all picked Big Pickle on the first attempt; free models change upstream, so yours can differ.
If no free model passes, OpenCode reports No free OpenCode model completed a request. The app remains available; retry OpenCode later or choose a provider in Settings.
Free models are offered by OpenCode Zen under OpenCode's own terms and privacy policy, which you should read before sending private code. They can be rate-limited, changed or withdrawn upstream; SpaceApp does not guarantee permanent free capacity.
Your first prompt#
Click inside the OpenCode pane, type a prompt and press Enter. A good first prompt needs no project and makes the model use a tool, which is where weak models fail:
List the files in your current directory, then explain in three short bullet points what rooms, panes and memory are in SpaceApp.A working agent shows its tool call (the directory listing), then the answer, and finally a line with the model name and the elapsed time, such as Build · <model> · 37.2s. A first answer can take a minute or more on a free model.
Once you have registered a project, give the agent a read-only task in it. Registered projects appear inside SpaceApp under /workspaces/<folder-name>:
Look at the project in /workspaces/example. Tell me what it does and where its entry point is, with file paths as evidence. Do not change any files.Then try one small, reviewable change, and inspect the diff yourself before you rely on it. A visible pane or a long answer is not proof that the work was done; check the files.
If the agent does not answer#
Free models fail in ordinary ways: a provider is rate-limited or temporarily unavailable, or a model cannot continue after a tool call. Work through these steps in order:
- Give the first request time. Model selection and the first answer can together take a couple of minutes.
- Stop the stuck request. Press Esc in the OpenCode pane to interrupt it.
- Switch the model in OpenCode. Type
/models, pick another free OpenCode Zen model (Big Pickle, or one whose name ends in Free), and send the prompt again. - Use your own provider. Run
/connectin OpenCode to add a provider account, or set up another CLI as described in Providers & credentials. - Check the host. If no pane responds at all, run
doctor,statusandlogson the host and follow Troubleshooting.
Since 1.1.2 the first-launch check accepts a free model only after it completes a real tool call, which removes the most common case (a model that answers plain text but fails on tools). A model can still stop working upstream later; then use step 3.
Workspace registration#
No arbitrary host project is mounted by default. Register only directories agents may read or modify:
npx --yes run-spaceapp@latest workspace add /home/alice/code/example
npx --yes run-spaceapp@latest workspace add /Users/alice/code/example
npx --yes run-spaceapp@latest workspace add /absolute/path/to/reference --read-only
npx --yes run-spaceapp@latest workspace list
npx --yes run-spaceapp@latest workspace remove /absolute/path/to/reference
npx --yes run-spaceapp@latest up
The first two add examples illustrate different OS paths; use the one matching the host. On Windows Command Prompt:
npx --yes run-spaceapp@latest workspace add "C:\Users\Alice\code\example"The path must be an existing directory given as an absolute path. workspace add prints Workspace registered: <path>, and the project appears inside SpaceApp as /workspaces/<folder-name>. workspace list prints the registered projects as JSON.
Apply changed mounts using up; service recreation can affect active work. Removal unregisters the project mount, not the source repository itself. Check actual runtime mounts if an agent cannot see a registered path.
Read-only access is appropriate for reference projects. Host-root access is a separate, much broader mode; selecting large does not grant it. Repository instructions and source files remain untrusted inputs even inside an authorized workspace.